> ## Documentation Index
> Fetch the complete documentation index at: https://aircloud.mintlify.site/llms.txt
> Use this file to discover all available pages before exploring further.
# Air Container
> AI 컨테이너를 Air Cloud에 배포하세요
Air Container는 컨테이너 기반의 AI 서비스를 빠르고 효율적으로 배포할 수 있도록 지원합니다. 이용 방법은 다음과 같습니다:
## 배포 흐름
### 1단계. 프로젝트 선택
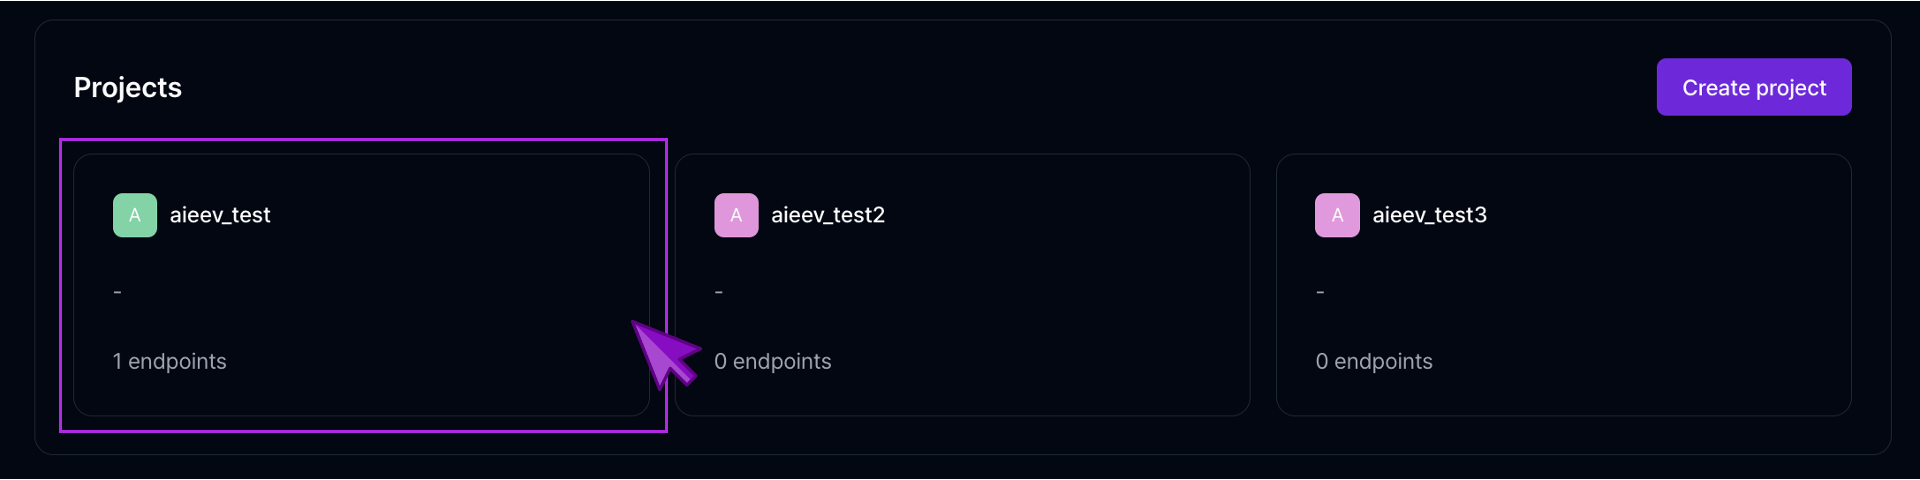 프로젝트 대시보드(Project Dashboard)로 이동한 뒤, 초기설정 과정 중에 생성한 조직과 프로젝트를 선택합니다.
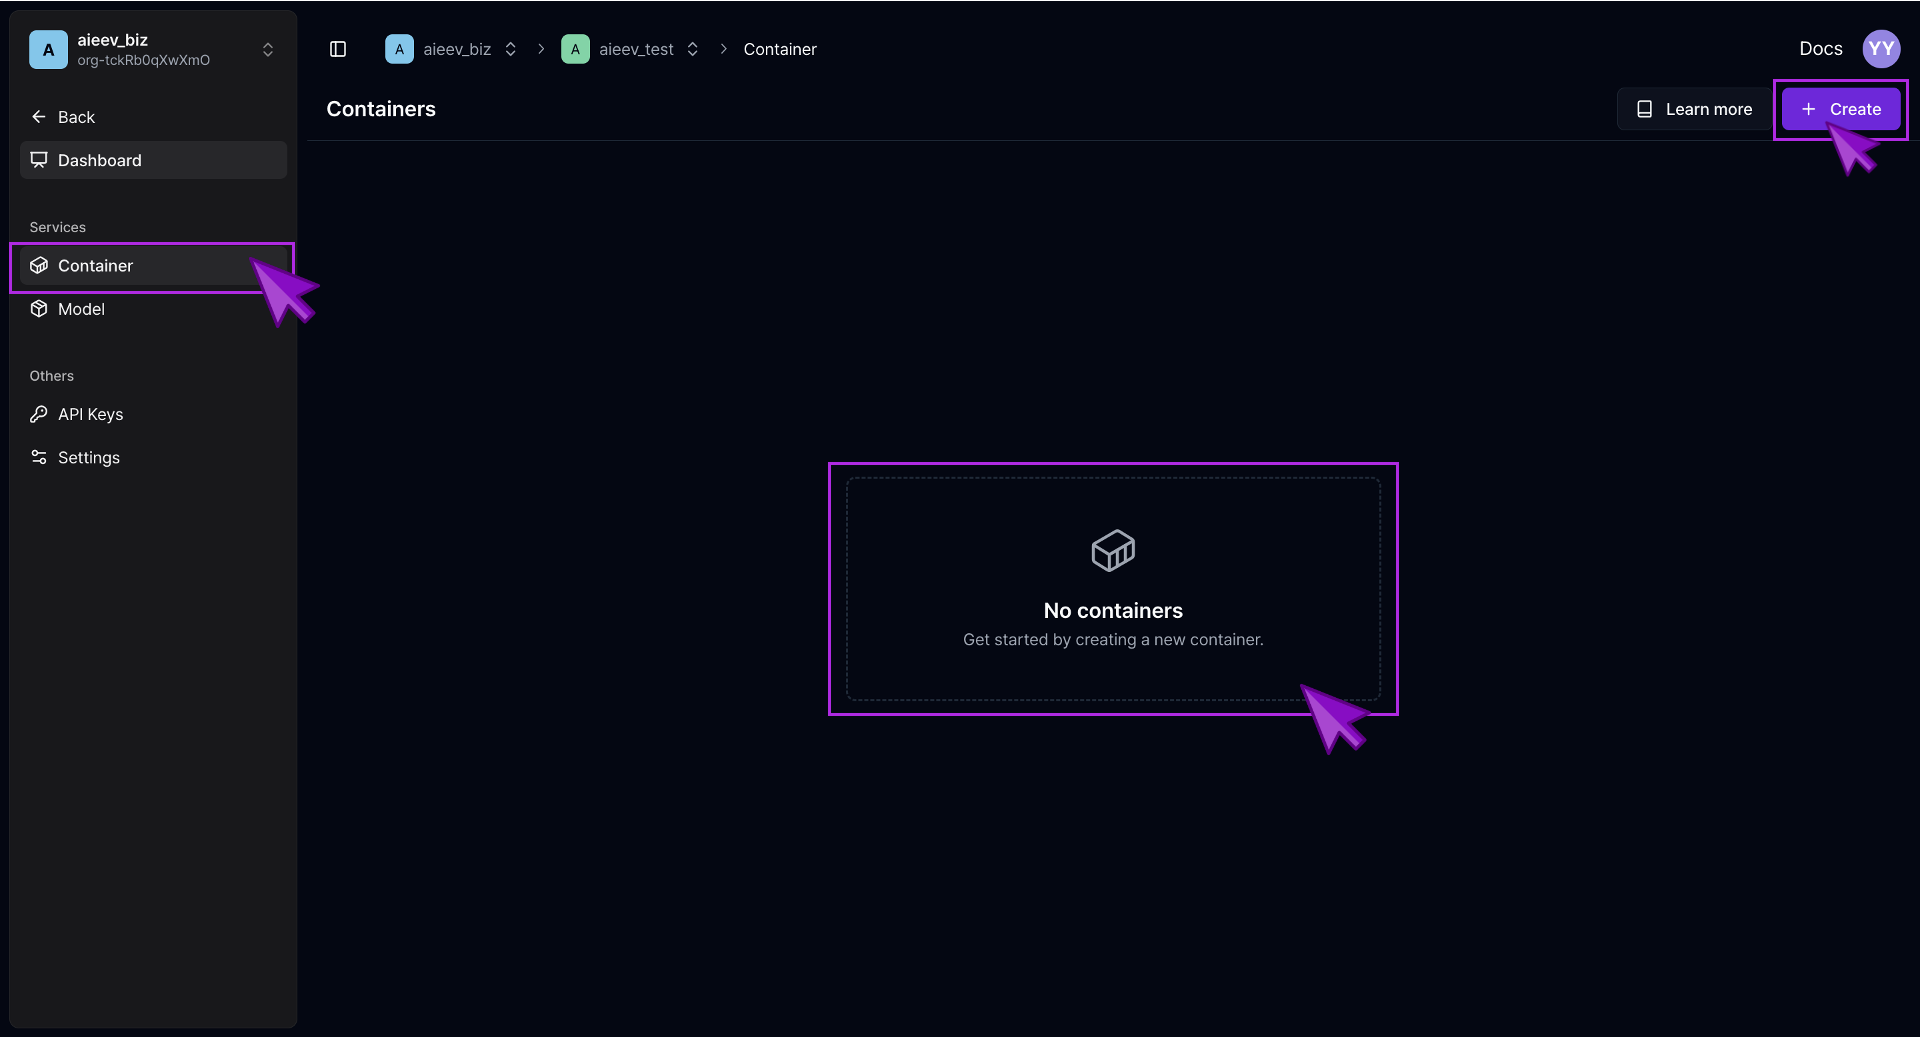 프로젝트 페이지의 서비스 탭에서 **"컨테이너(Container)"** 서비스를 선택하고 **\[+ Create]** 버튼을 클릭하여 새 컨테이너를 생성합니다.
### 2단계. 기본 설정
프로젝트 페이지의 서비스 탭에서 **"컨테이너(Container)"** 서비스를 선택하고 **\[+ Create]** 버튼을 클릭하여 새 컨테이너를 생성합니다.
### 2단계. 기본 설정
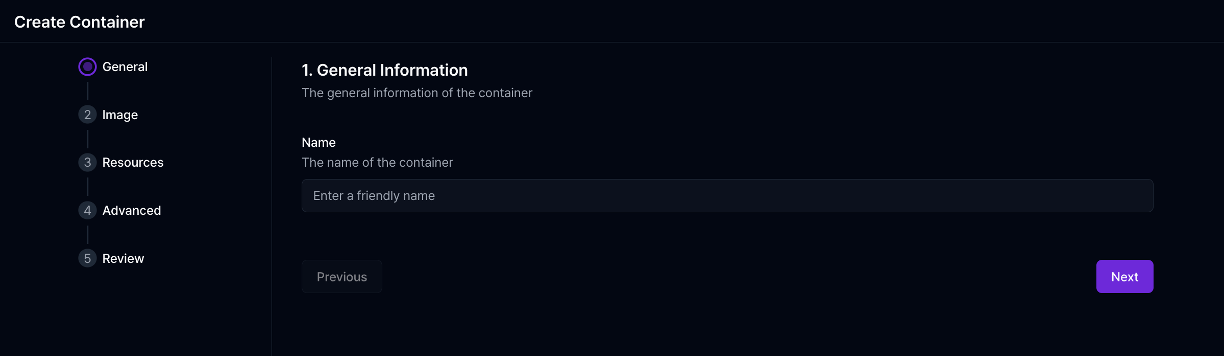
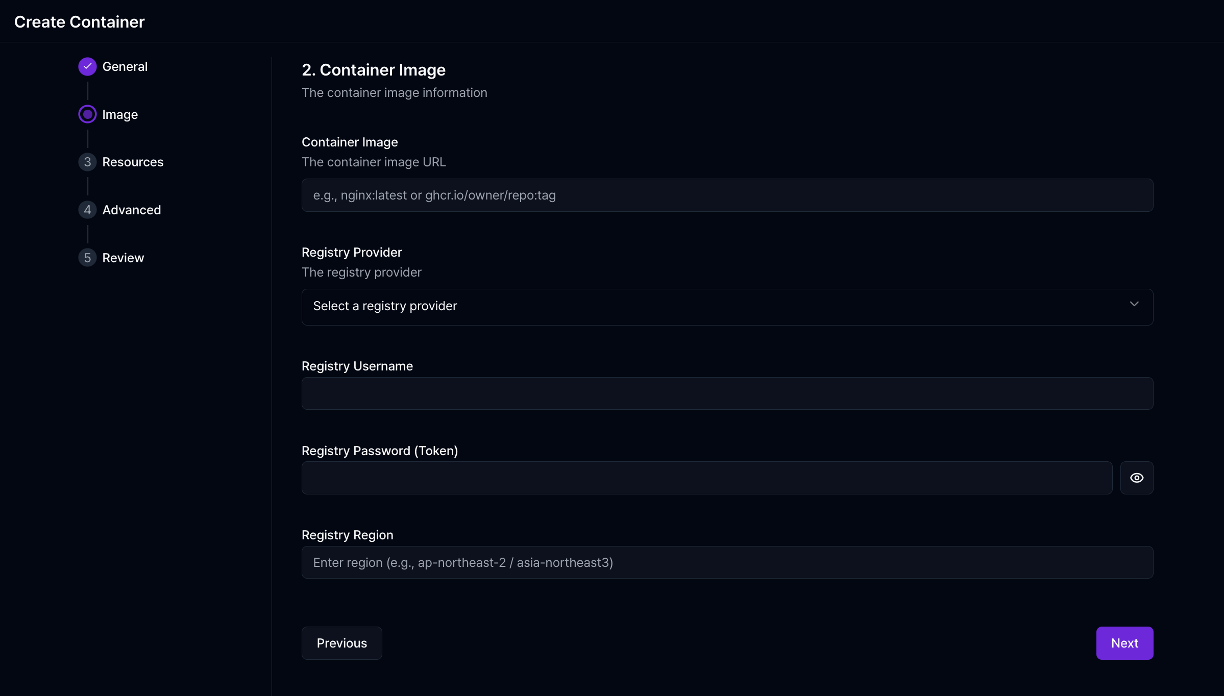 컨테이너 생성 시 다음 항목들을 입력해야 합니다:
컨테이너를 식별하기 위한 사용자 정의 이름
컨테이너가 제공하는 서비스 유형 (향후 Playground 연동에 사용됩니다)
컨테이너의 Docker 이미지 URL
이미지가 호스팅된 레지스트리 (예: GitHub Container Registry, Docker Hub 등)
프라이빗 레지스트리에서 이미지를 불러올 경우 입력 필요
### 3단계. 리소스 구성
컨테이너 생성 시 다음 항목들을 입력해야 합니다:
컨테이너를 식별하기 위한 사용자 정의 이름
컨테이너가 제공하는 서비스 유형 (향후 Playground 연동에 사용됩니다)
컨테이너의 Docker 이미지 URL
이미지가 호스팅된 레지스트리 (예: GitHub Container Registry, Docker Hub 등)
프라이빗 레지스트리에서 이미지를 불러올 경우 입력 필요
### 3단계. 리소스 구성
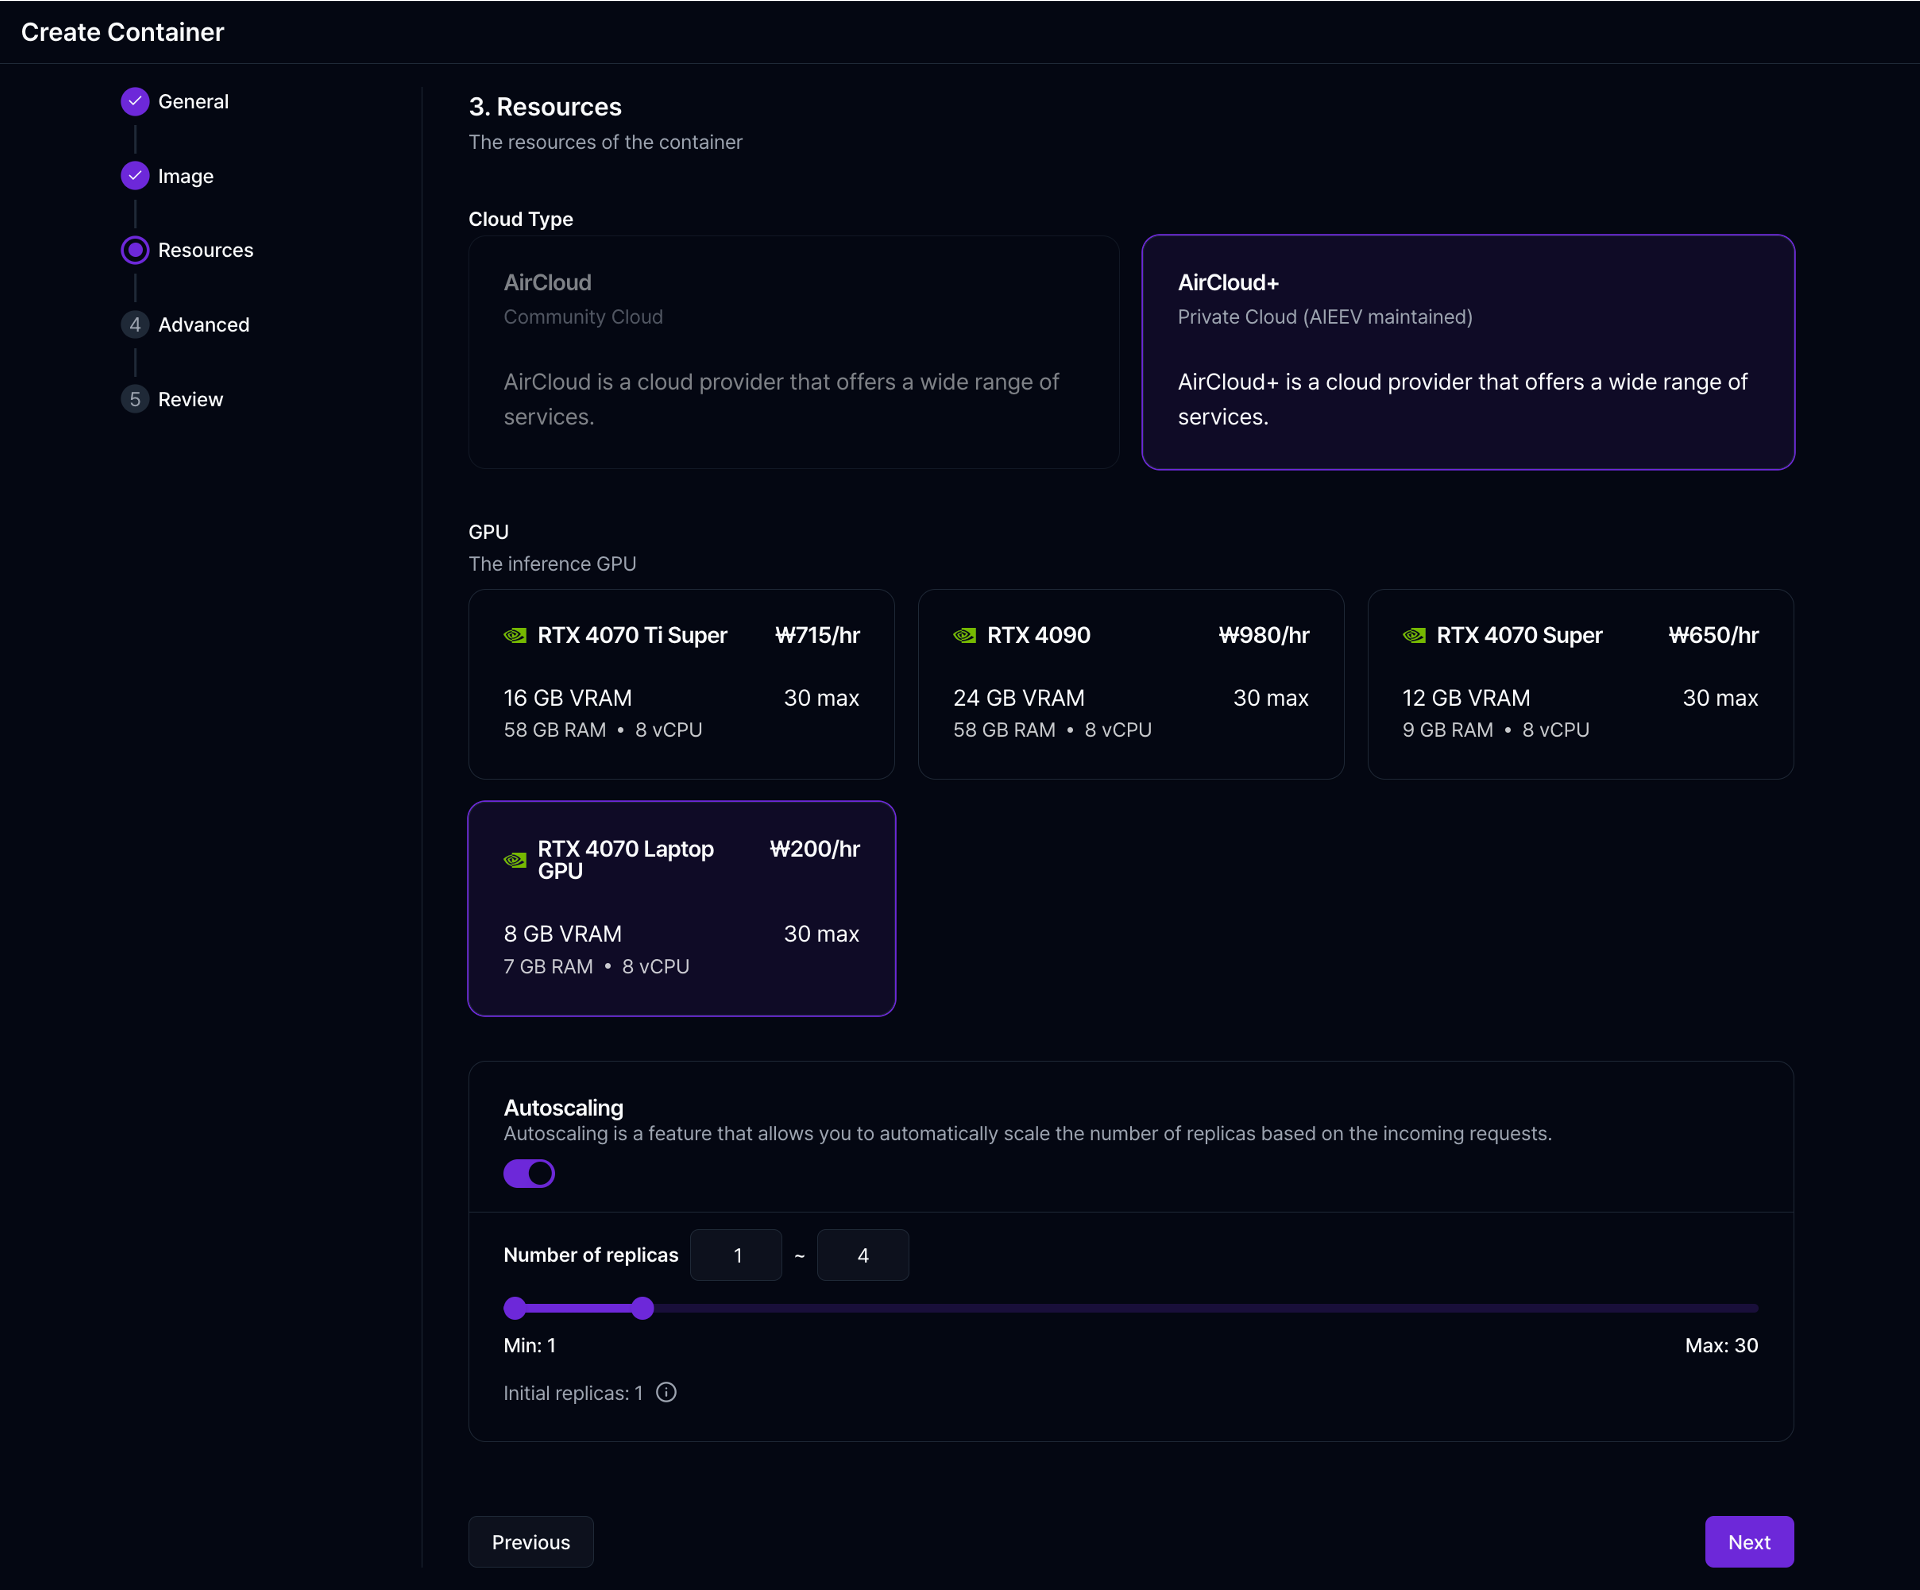 * **일반 모드(General Mode)**: 인스턴스 유형을 선택합니다 (예: RTX 4070, 4090).
* **오토스케일 모드(Autoscaling Mode)**: 최소 및 최대 복제 수를 설정합니다 (1\~30개). 그 이상의 높은 수치를 설정할 경우 관리자 승인이 추가적으로 필요합니다.
### 4단계. 고급 설정
* **일반 모드(General Mode)**: 인스턴스 유형을 선택합니다 (예: RTX 4070, 4090).
* **오토스케일 모드(Autoscaling Mode)**: 최소 및 최대 복제 수를 설정합니다 (1\~30개). 그 이상의 높은 수치를 설정할 경우 관리자 승인이 추가적으로 필요합니다.
### 4단계. 고급 설정
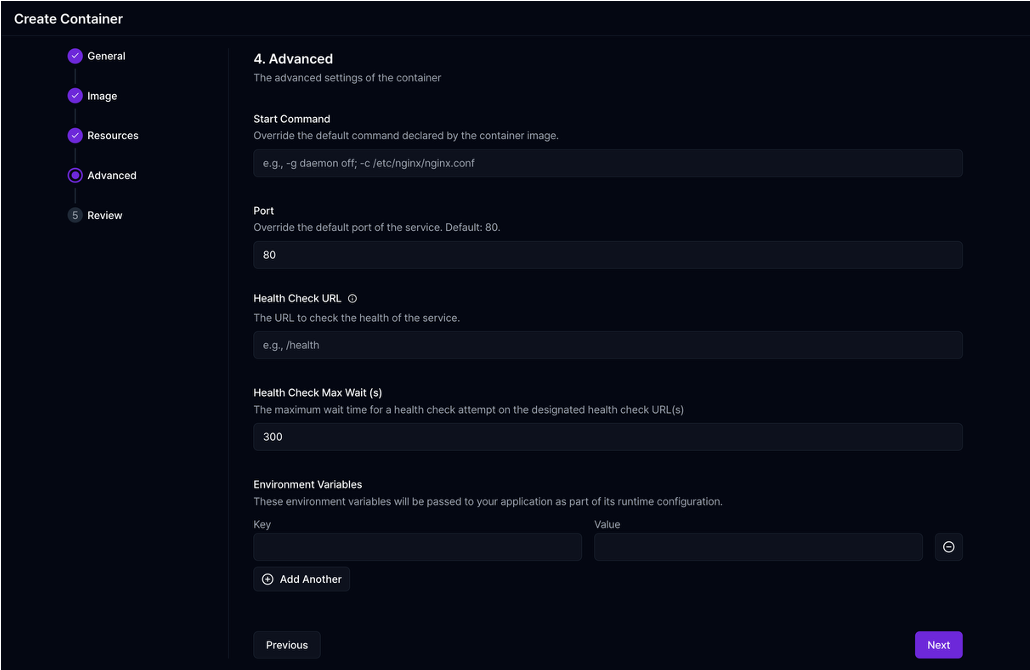 Advanced 섹션에서는 다음과 같은 추가 옵션을 설정할 수 있습니다:
컨테이너 이미지의 기본 시작 명령어를 재정의
컨테이너에서 기본 노출할 포트 재정의
컨테이너의 상태를 확인할 헬스 체크 URL 지정. (예: /api/health).
애플리케이션 실행에 필요한 key-value 형태 설정 (예: DB 인증 정보, API 키 등)
### 5단계. 검토 및 배포
Advanced 섹션에서는 다음과 같은 추가 옵션을 설정할 수 있습니다:
컨테이너 이미지의 기본 시작 명령어를 재정의
컨테이너에서 기본 노출할 포트 재정의
컨테이너의 상태를 확인할 헬스 체크 URL 지정. (예: /api/health).
애플리케이션 실행에 필요한 key-value 형태 설정 (예: DB 인증 정보, API 키 등)
### 5단계. 검토 및 배포
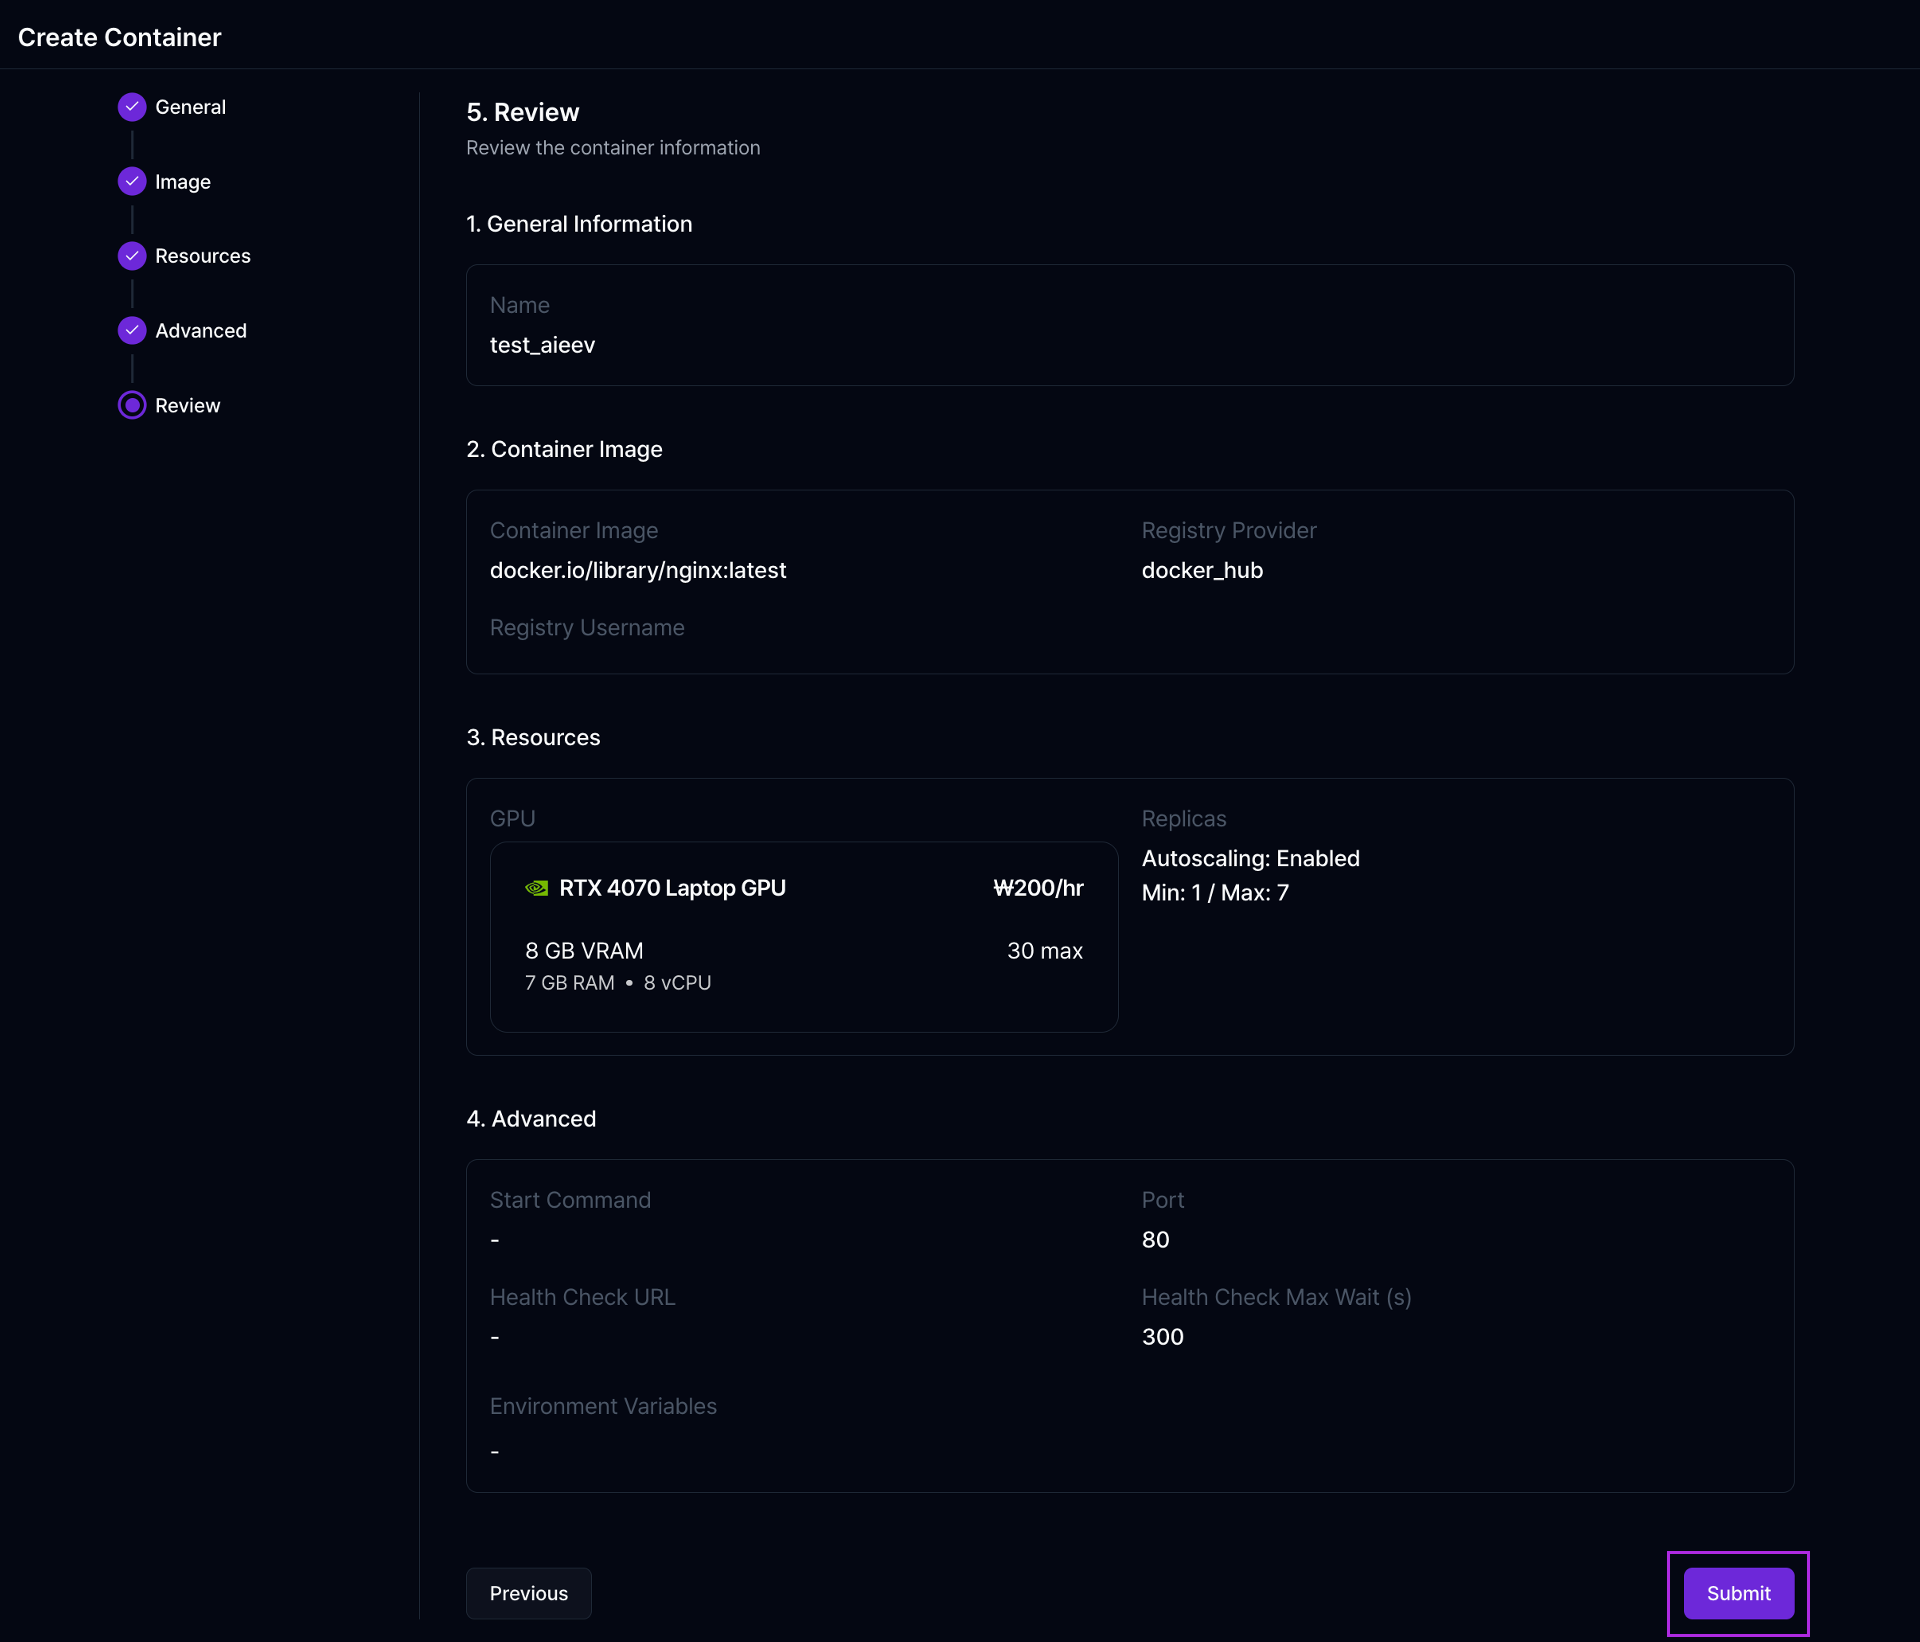 ### 6단계. 배포 완료
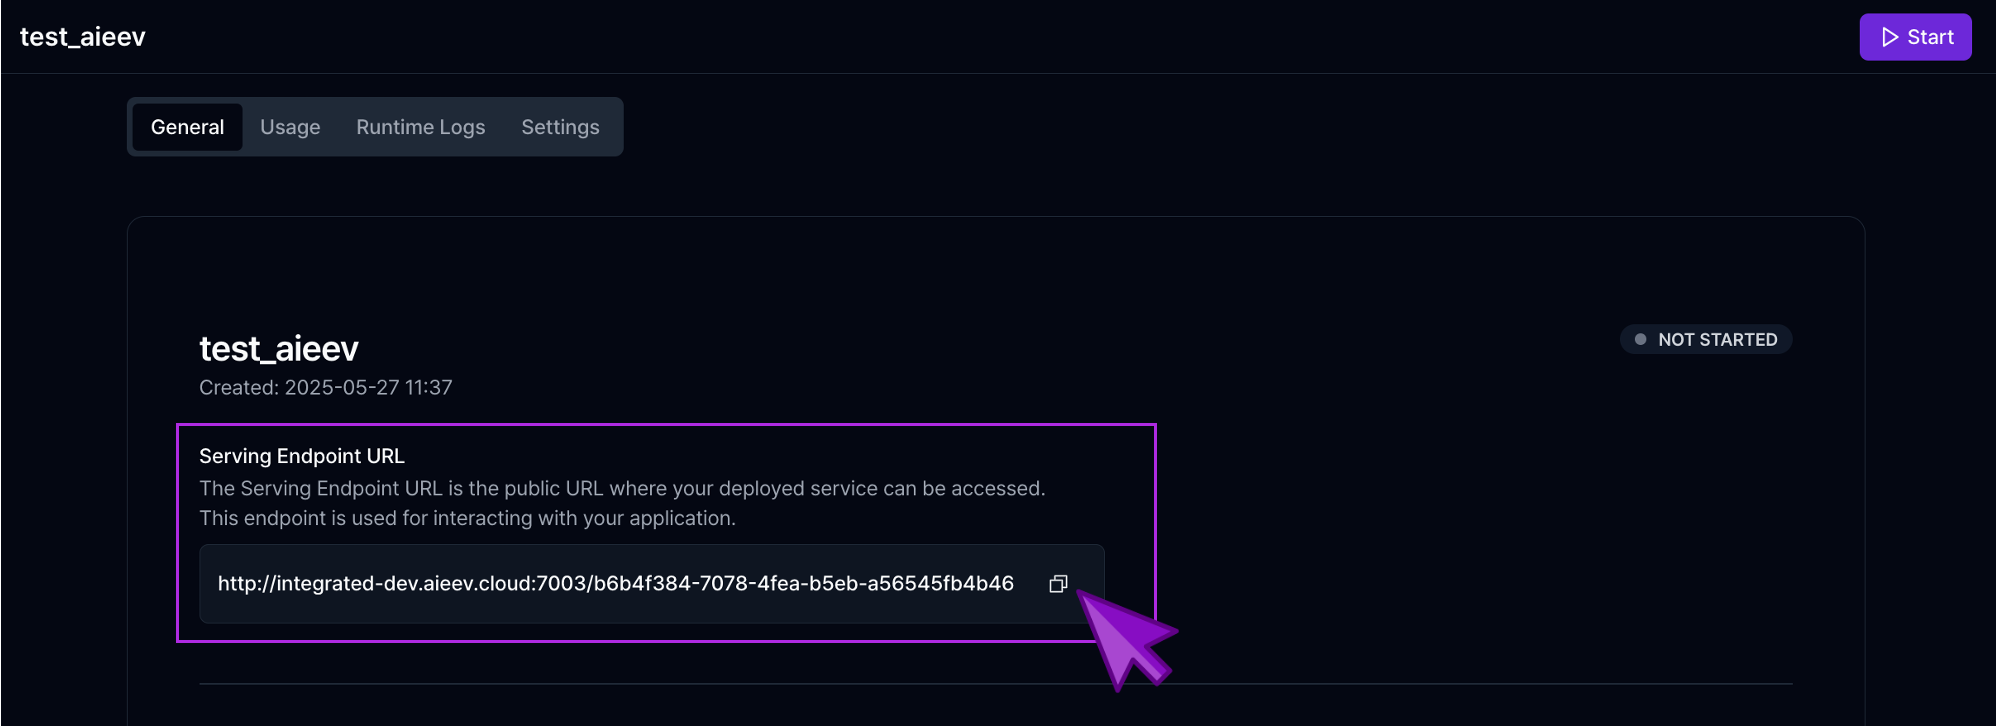 컨테이너가 배포 즉시 실행되며, API 엔드포인트 또는 서비스 URL이 자동으로 제공됩니다.
* 생성된 컨테이너는 좌측 목록에 표시됩니다.
* 목록에서 항목을 선택하면 우측 패널에 상세 정보가 표시됩니다.
* 우측 패널에서 컨테이너 설정을 수정할 수 있습니다.
* "대시보드(Dashboard)" 버튼을 클릭하면, 컨테이너 상태 및 활동 로그를 확인할 수 있는 상세 관리 페이지로 이동합니다.
## API 요청
컨테이너 상태가 실행 중(RUNNING)일 때, 노출된 엔드포인트를 통해 AI 추론 API에 접근할 수 있습니다. 요청 시 호스트 주소 부분을 해당 컨테이너의 엔드포인트 URL로 교체해야 합니다.
```bash cURL theme={null}
curl --request POST \
--url ${ENDPOINT_URL}/api/v1/chat/completions \
--header "Accept: application/json" \
--header "Authorization: Bearer ${YOUR_API_KEY}" \
--header "Content-Type: application/json" \
--data '{
"messages": [
{
"role": "system",
"content": "You are a helpful assistant."
},
{
"role": "user",
"content": "Write a haiku about recursion in programming."
}
]
}'
```
컨테이너가 배포 즉시 실행되며, API 엔드포인트 또는 서비스 URL이 자동으로 제공됩니다.
* 생성된 컨테이너는 좌측 목록에 표시됩니다.
* 목록에서 항목을 선택하면 우측 패널에 상세 정보가 표시됩니다.
* 우측 패널에서 컨테이너 설정을 수정할 수 있습니다.
* "대시보드(Dashboard)" 버튼을 클릭하면, 컨테이너 상태 및 활동 로그를 확인할 수 있는 상세 관리 페이지로 이동합니다.
## API 요청
컨테이너 상태가 실행 중(RUNNING)일 때, 노출된 엔드포인트를 통해 AI 추론 API에 접근할 수 있습니다. 요청 시 호스트 주소 부분을 해당 컨테이너의 엔드포인트 URL로 교체해야 합니다.
```bash cURL theme={null}
curl --request POST \
--url ${ENDPOINT_URL}/api/v1/chat/completions \
--header "Accept: application/json" \
--header "Authorization: Bearer ${YOUR_API_KEY}" \
--header "Content-Type: application/json" \
--data '{
"messages": [
{
"role": "system",
"content": "You are a helpful assistant."
},
{
"role": "user",
"content": "Write a haiku about recursion in programming."
}
]
}'
```